Quantcast
Channel: Lucy-Wonderland
Viewing all 481 articles
Browse latest View live

Make time card

$
0
0
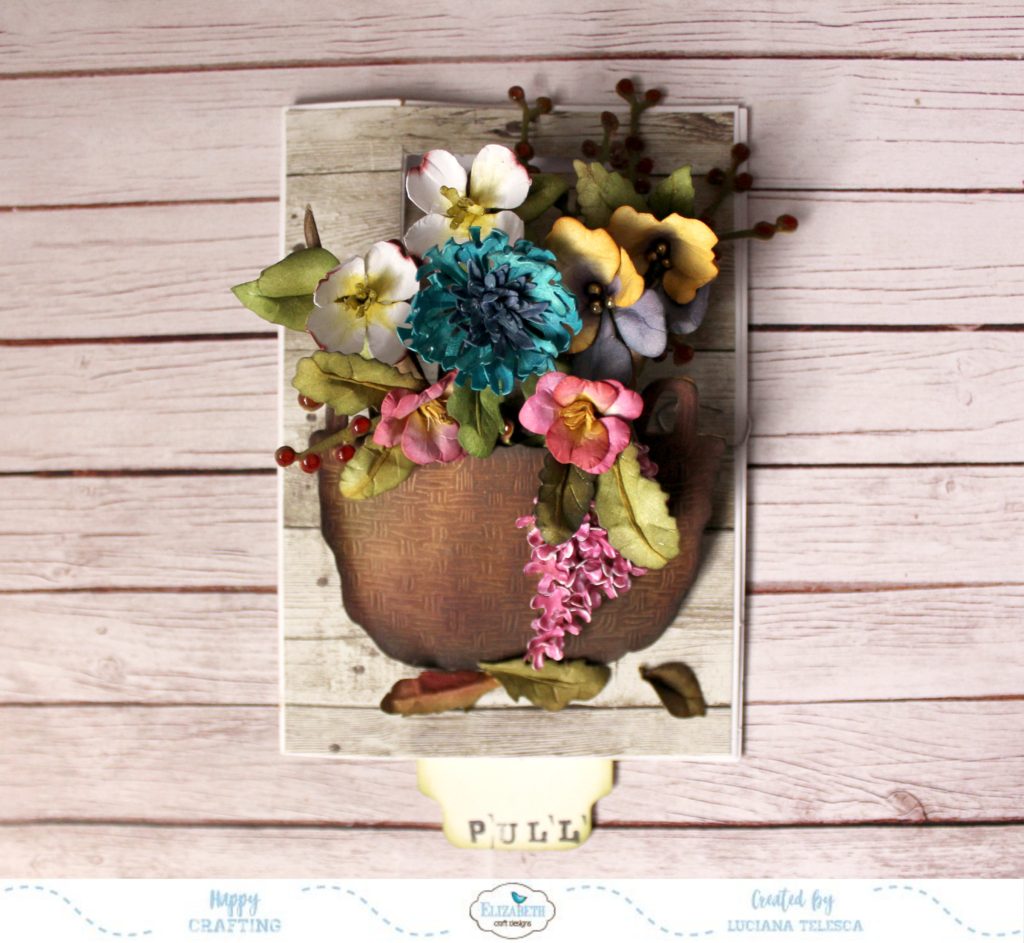
Ciao!! Ci ritroviamo qui con una nuova card e per parlarvi di una nuova collezione, quella di Becky Seddon. Nella nuova ci sono tantissime fustelle, alcune dall'aspetto un po' vintage e se vogliamo anche adattabili a card maschili o a tema steampunk, e sono una più bella dell'altra! Io ho deciso di iniziare dall'orologio.....perchè amo gli orologi da taschini ^-^ ma già sto pensando a come poter usare tutte le altre!!
 _ _
Hello!!I'm here with a new card and to write down a little bit about a new collection, designed by Becky Seddon.In the new collection there are so many dies, one more beautiful than the other! they are a little bit vintage, so we can use for masculine cards and also for a steampunk one. I decided to start from the clock ..... because I love the pocket watches ^ - ^ but I'm already thinking about how to use all the other ones!!


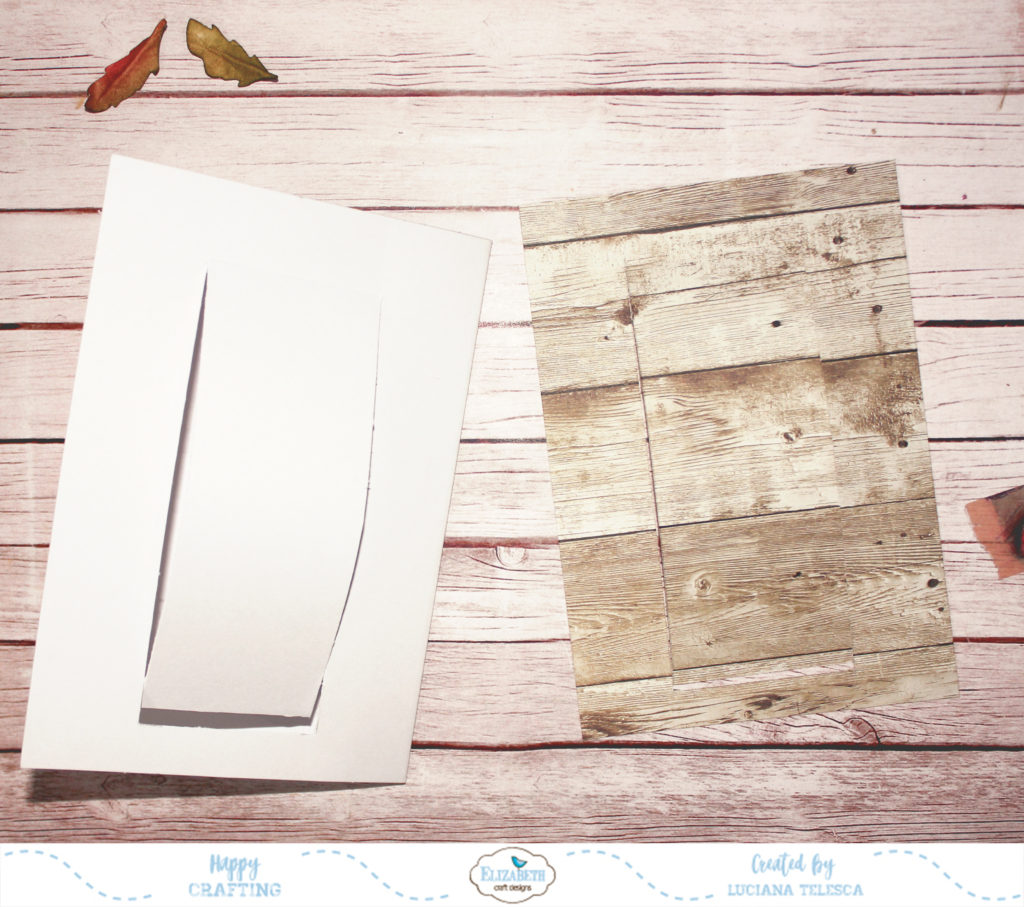
L'orologio è composto da più livelli da sovrapporre. A me piaceva l'idea di farlo un po' vintage, con della patina e ruggine, ottenuta attraverso della pasta texturizzata e del colore oro. Le lancette si muovono per davvero ^-^
 _ _
The clock is made by multiple layered dies, that have to be overlaid. I would made it a little bit vintage, with rust and patina, obtained through textured paste and a gold color. The lancets move for real ^ - ^
Ho incollato l'orologio alla card usando uno spessore sotto, in modo da farlo rialzato e permettermi così di circondarlo di violette e alcuni rametti di bacche
_ _
I glued the clock to the card using a thickness below, so it is raised and allow me to surround it with violets and some branches of berries
  
la card è poi completata da questa splendida scritta nera, che è una fustellata contenuta sempre nel set dell'orologio. Mi fa impazzire il lettering della parola MAKE ^-^ 
_ _
the card is completed by this splendid black sentiment, which is a die-cut that was inside the same kit with the pocket watch. It makes me crazy the lettering of the word MAKE ^ - ^
Questo è un elenco dei materiali utilizzati per realizzarla:
_ _
This is a list of the materials used to make it:


Non dimenticate di passare per il post sul blog di Elizabeth craft design per visualizzare tutti i prodotti della nuova collezione, e per vedere i progetti delle altre ragazze del team!!
_ _
Do not forget to go to the Elizabeth craft design blog post to view all the great new products, and to see the projects of the other girls of the design team !!


alla prossima xx
Lucy-Wonderland

Primrose

$
0
0
ciao!! il quadro che ho realizzato oggi è davvero molto semplice, volevo ricordasse una sorta di pagina di vecchio erbario.
_ _
Hello!! The picture that I made for today is very simple. I want to recreatesomething that could seems like an old herbarium page.
Ho usato alcuni fogli di un libro vecchio e ingiallito, e delle stampe della collezione "wood effect""relax in the garden", in modo da creare un gioco di sovrapposizioni. Ho fustellato un quadrato con le cuciture sul bordo "dashing squares".
_ _
I used some sheets of an old and yellowed book, and some prints from the "wood effect" and "relax in the garden"collections , to create a game of overlapping. I cut out a square with the seams on the edge.


Ho modellato una primula e l'ho incollata su una fustellata quadrata. Ho scritto con la macchina da scrivere il  nome del fiore raccolto ^-^
ho ritagliato la scritta "for you" e l'ho decorata con del glitter ramato.
_ _
I modeled a primrose and glued it on the upper square. I wrote with the typewriter the name of the flower collected ^ - ^ 

I cut out the word "for you" and decorated it with coppery glitter.


Qui sotto trovate la lista completa dei materiali usati. Alla prossima!
LucyWonderland
_ _
Below is a complete list of used materials. See you next time!
LucyWonderland


A pop-up basket of Flowers

$
0
0
Lucy Wonderland

Ciao a tutti!!Sono davvero entusiasta di far parte del design team di Elizabeth Craft Design e per il mio primo post per il loro blog vorrei creare qualcosa di pop-up, semplicemente perché amo il pop-up! Mi piace giocare con le pagine e le carte, come tirare, spingere, girare e piegare, aprire e scoprire ... e così via!
Mi piaceva l'idea di creare una cartolina con alcuni fiori che crescano fuori dalla base. La fustella Gathering Basket mi ha offerto la giusta soluzione per concretizzarla. Perciò, vediamo insieme cosa fare ^-^

_ _
hello everyone!! I'm really exited to be part of the Elizabeth Craft design team, and for my first post for their blog I would create something pop up, just because I love the pop up!
I like play with pages and cards, like pull, push, turn and fold, open and discover...and so on!
So I would like creating a card with flowers that simply come out from the base. The Gathering Basket from the garden notes collection offered me the right soluction. For the full english tutorial, please go on this page : english tutorial

Step 1.

Come base ho utilizzato un foglio di Soft Finish Cardstock 8.5" X 11". Taglialo seguende le seguenti misure, prestanto attenzione alle linee continue rosse da tagliare, e le linee trattegiate blu da piegare.
Lucy Wonderland

Per decorare la carta, io ho ritagliato anche un foglio della collezione "Wood Effect", che ho poi incollato sulla parte anteriore della card.

step 2

Incolla la striscia di cartoncino sul pezzo centrale della biglietto, in corrispondenza del taglio, nella parte interno del biglietto.
Lucy Wonderland

in questo modo, quando tiri la striscia, la parte centrale ritagliata si gonfierà al di fuori del biglietto.

Lucy Wonderland

step 3

Fustella due volte il cestino Gathering Basket, e incollale tra loro lungo 3 bordi, in modo da creare una piccola tasca.
Lucy Wonderland
Lucy Wonderland

step 4

Incolla il cestino sulla parte centrale del biglietto, in corrispondenza della piegatura.
Lucy Wonderland

step 5

Prepara tutti i fiori, rami e foglie che ti possono piacere e che andranno a riempire il nostro cestino. Io ho preparato:
  • the Berry Spray, un ramo di bacche
  • the Lilac 2, la lillà
  • the Pansy 2, la violetta
  • the Cornflower Bachelor Button, il fiordaliso
  • the Primrose 1, la primula
  • the Doogwood 2, il corniolo

Lucy Wonderland

Lucy Wonderland


Lucy Wonderland

Lucy Wonderland

step 6 

Metti tutto dentro il cestino
Lucy Wonderland

step 7 

Fallo alzare fuori dal biglietto!! ^-^
Lucy Wonderland

Spero che questo tutorial ti abbia divertito, grazie per esserti fermato a leggerlo. Qui sotto troverai tutta la lista di prodotti che io ho utilizzato. Alla prossima!

Lucy Wonderland


Materiali usati: 
Elizabeth Craft Designs:


Altri brands
Distress ink pad
Ranger glossy accent
Fiskars 12" Premium Cut Trimmer

Missing piece

$
0
0
ciao!!Oggi vi vorrei mostrare una nuova cartolina, che ho realizzato utilizzando alcuni dei nuovi prodotti di Joset van de Burgt. Mi piaceva l'idea che il cuore rosso di lei avesse bisogno di un pezzetto del cuore nero di lui per potersi sentire completo.
_ _
hello !! Today I would like to show you a new postcard, which I made using some Joset van de Burgt's new products. I liked the idea that her red heart needed a piece of his black heart to be able to feel complete.


La card è molto semplice da relizzare:
Ho tagliato i due cuori da colorare;
Su uno dei due ho timbrato un sentiment e alcuni cuoricini
ho ritagliato dei pezzi di puzzler, e ho scelto quale mi sembrava si armonizzasse con l'insieme;
ho inserito alcuni rametti verdi;
invece delle bacche ho messo dei cuoricini presi dalla fustella per i bordi decorati;
ho incollato tutto su una card.
_ _
The card is very simple to prepare:
I cut the two hearts to be colored;
On the one of two, I stamped a sentiment and some hearts;
I cut the pieces of the puzzler, and than I chose one harmonized with the whole card;
I inserted some green branches;
Instead of berries, I put some hearts taken from the edge dies;
I glued everything on a card.


che ne pensate del risultato finale? Aspetto i vostri commenti ^-^. Non dimenticate di passare a guardare anche i lavori fatti delle mie college del dt.
_ _
what do you think of the final result?  ^ - ^
Don't forget to go on this post to see all the gorgeous works of my team mates 

A domani,
Luciana

Season of a change

$
0
0
Ciao!Probabilmente non tutti conosceranno la canzone "season of change", scritta e composta da Timo Tolkki. E' una canzone che quando l'ascoltai la prima volta mi colpì molto, forse perchè era un  periodo un po' particolare. Nel momento più "enfatico" della canzone, viene detto: all the pain and sorrow will be wash away by rain. Tutto questo preambolo per raccontarvi un po' come nasce questa card ^-^
_ _
Hello! Probably not everyone will know the song "season of change", written and composed by Timo Tolkki. It's a song that I loved it as soon as I heard it, maybe because of the period of my life. At the most "emphatic" moment of the song, it is said: all the pain will be washed away by rain. All this preamble to tell you how this card is born ^ - ^
Quando ho visto questo pacco di timbri con la bimba in impermeabile, mi è venuto in mente questa canzone e mi sono immaginata questa bimba che esce fuori dal quadro per offrirle un fiore e rassicurarla che: all the pain and sorrow will be wash away by rain.
_ _
When I saw this pack of stamps with the girl in raincoat, this song came to my mind and I imagined a little girl coming out of the picture to offer her a flower and reassure her that: all the pain will be washed by rain.

Ho voluto giocare un po' con i volumi, le trasparenze e i livelli.
Ho ritagliato il cuore su entrambi i lati della card e ho rivestito il foro con del vellum.
dietro al vellum, in semitrasparenza, ho creato una parte piena,  inserendo della carta legno su cui ho incollato una finestra di fiori;
ed una parte vuota, dove ho inserito un piccolo sentiment;
sopra al vellum, ho invece fattu uscire la bimba con il fiorellino.
_ _

I wanted to play a little bit with volumes, transparencies and levels. so:
I cut the heart on both sides of the card and I covered the hole with some vellum;
behind the vellum, in semitransparency, I created a solid part, inserting some wood paper with a window of flowers; and an empty part, where I inserted a small sentiment;
on top of the vellum, I brought out the little girl with the little flower.


Ho voluto dare un po' di spessore all'altra bimba, quella esterna al quadro, sovrapponendo diversi livelli. Ho disegnato delle cuciture intorno al cuore, aggiunto qualche macchia di inchiostro sul vellum, e qualche enamel dots nero per completare l'insieme ^-^

_ _
I wanted to give a little 'bit of thickness to the other child, the one outside the picture, overlapping some different levels. I drew some seams around the heart, added some ink stain on the vellum, and some black enamel dots to complete the whole ^ - ^

Non dimenticate di passare in questo post qui per vedere tutte le altre interpretazioni, ciao alla prossima!
_ _
don't forget to go in this post here to see all the other performances, bye!

Love is in the air...

$
0
0
ciao!! San Valentino è alle porte, è tempo di pensare al biglietto di auguri!!
Io ne ho realizzato uno con un tris di mongolfiere, e spero possa esservi di qualche ispirazione ^-^
Per prima cosa ho creato uno sfondo vintage utilizzando un cartoncino bianco, colorato con i distress oxide "broken china", e "walnut stain" per i bordi. ho usato un UNI posca bianco per fare qualche schizzo di colore.
_ _
Hello!! Valentine's Day is coming, it's time to think of the greeting card !! 
I have made one with a trio of hot air balloons, and I hope it could inspire you in someway ^ - ^
Firstly, I created a vintage background using a white cardboard, colored with the oxide distress "broken china", and "walnut stain" for the edges. I used a white UNI posca to make some splashes of color. 
Ho quindi usato le tre mongolfiere, personalizzando ognuna di esse. Per esempio in quella centrale ho usato una freccia di Cupido.
_ _
I then used the three balloons, customizing each one of them. For example I used a Cupid arrow for the central one.
Ho fustellato più strati della mongolfiera più grande, a cui poi ho rimosso un cerchio centrale. Incollando così i vari strati tra loro ho potuto ottenere una shaker-mongolfiera. Ho aggiunto anche qualche fiore a lato per addolcire la card.
_ _
I punched several layers of the biggest balloon, and then I removed a central circle on them. Gluing the various layers together,  I could get a shaker-balloon! I also added some flowers to the side to sweeten the card.
Nella mongolfiera più piccola ho inserito un piccolo sentiment, ovvero una scritta fatta con la mia macchina da scrivere, per dargli quel tocco vintage.

trovate sotto la lista di tutti i materiali usati, mentre qui troverete le altre interpretazioni del tema delle altre ragazze del Design Team  
_ _

In the smallest balloon I inserted a small sentiment, writted with my typewriter, to give it that vintage touch.
 
you can find below the list of all the materials that I used, and you can find here all the interpretations of the theme of the other girls of the Design Team


Alla prossima!!
Luciana

Two Easter cards

$
0
0
ciao!! Ecco l'ultime due card che ho preparato in questi giorni, pronte per la pasqua!
la prima card richiama l'albero pasquale. Non so se è una cosa che viene effettuata solo dalle mie parti o quanto sia diffuso. Si tratta generalmente di un ramo di albero, decorato con fiori e uova.
Ho quindi utilizzato delle fustelle della collezione di Susan Tierney-Cockburn per creare questo ramo fiorito
_ _
Hello!!
These are the last two cards I have prepared in the these days, ready for Easter! The first card recalls the Easter tree. I don't know if it is a tradition only in my country, or  if it is widespread. It is generally a branch of a tree decorated with flowers and eggs. I then used die-cuts from the Susan Tierney-Cockburn collection to create this flowery branch
ho poi timbrato queste piccole uova, colorate con una penna gel bronzata. Invece con una penna a punta fine ho disegnato dei piccoli fili che collegano le uova ai rami. 
_ _
I then stamped these small eggs, colored with a copper gel pen.Then, with a fine-tipped pen I drew some lines that connect the eggs to the branches.

ho completato il biglietto con delle pailettes abbinate, e con la scritta Happy Easter!
_ _
I completed the card with some matching sequins, and with the words Happy Easter!

ho creato un secondo biglietto perchè mi sono letteralmente innamorata di questo set di fustelle del coniglio. è davvero troppo tenero!!!
_ _
I created a second card, just because I literally fell in love with this set of rabbit die cuts. it's really too cute !!!

ho usato la stessa scritta happy easter, ma con il color bianco questa volta.
ho deciso di mettere il coniglio di schiena, perchè lo trovo molto simpatico.
_ _
I used the same happy easter, but with the white color this time, and I decided to put the rabbit from the backside, because I find it is so nice.

ho decorato il bordo della tana del coniglio con dell'erbetta e alcuni fiorellini. Il coniglietto è decorato con un piccolo fiocchetto rosa
_ _
I decorated the edge of the rabbit's hole with some grass and some little flowers. The bunny has a small pink bow
Non dimenticatevi di passare sul sito della Elizabeth Craft Designs per poter partecipare al giveway e vedere tutte le altre bellissime interpretazioni del design team.
Per partecipare al giveaway dovrete semplicemente lasciare un commento nel post  Elizabeth Craft Designs Challenge dicendo  "quale timbro o set di fustelle della Elizabeth Craft Designs vi piacerebbe usare per creare una card per Pasqua".
Saranno selezionati 3 fortunati vincitori in modo casuale, e saranno annunciati Venerdì 2 Marzo sul Blog della Elizabeth Craft Designs.
 _ _
For today's challenge Elizabeth Craft Designs are giving away a $20 Gift Card to use on our website to 3 winners

To enter simply leave a comment on the Elizabeth Craft Designs Challenge post and tell us "What Elizabeth Craft Designs dies or stamp sets would you use to create an Easter Card?

We will select 3 lucky winners in a random drawing 

The winners will be announced on Friday, March 2nd on the Elizabeth Craft Designs blog.
Buona fortuna!! Luciana

A winter Planner setup

$
0
0
Ciao!!E' da un po' che non condivido con voi qualche setup per planner.
Oggi vorrei provare a rimediare, mostrandovi un po' il setup invernale per la mia agenda.

Molte di voi saranno già in ottica "primaverile". Ma io che adoro l'inverno...no!!
E per fortuna in questi giorni mi ha aiutato la neve a farmi sentire ancora in pieno inverno ^-^
_ _
Hello !! It's been a while since I've shared some planner setups with you.Today I would like to remedy, showing you the winter setup for my planner. Many of you will already be in a "spring" perspective. But I, that I love winter, ... no !!And luckily the snow of these days helped me to make me feel again in the middle of winter ^ - ^


Vi lascio sbirciare solo una piccola anteprima della mia agenda, perchè trovate il video tutorial e il relativo post in questo link qui: Frozen Forest _ un planner setup invernale.
 _ _
I let you peek only a small preview of my planner, because you'll find the video tutorial and the related post in this link here: Frozen Forest _ a winter planner planner
Buona visione, alla prossima ^-^
Lucy-Wonderland

Triangle box

$
0
0
Ciao!! Rieccomi qui con un altro tutorial che spero possa divertire e ispirarvi ^-^
Ho utilizzato la fustella Triangle box di ModaScrap. E' troppo divertente!!
_ _
Hello everyone!! I'm here with a tutorial that I hope you will like ^-^
I used the Triangle Box die by ModaScrap. It is so fun!

Step 1

Fustellate la scatola utilizzando un foglio di cartoncino bianco e coloratelo con i prodotti che preferite, io ad esempio ho utilizzato della pasta nera, stesa con uno stecil, e dei distress in pad
_ _
Cut the box from a piece of white cardstock and color it with media of your choice. Black handmade paste through a stencil and some distress ink pads used here. 

Step 2

Timbrate sul del cartoncino bianco alcune immagini dai due set di timbri,"Cacti" e "Garden Party". Colorate i timbri con gli acquerelli ed utilizzate le fustelle coordinate per ritagliarli. Avrete ottenunto così dei simpatici DieCuts ^-^
_ _
Stamp some images from the two stamp sets, "Cacti" and "Garden Party", onto white cardstock. Watercolor images and then use the coordinating dies to die cut them.

Step 3

Asseblate i vari pezzi per creare le scatoline
_ _
Assemble the pieces to create the boxes ^-^
Questi sono alcuni esempi di scatole realizzate
_ _
These are just some of the many triangle boxes that I made


Potete vedere l'intero procedimento nel video qui sotto.
 _ _
You can see the process on the video below.

Spero che questo tutorial vi sia di ispirazione e che vi abbia divertito!! grazie per esservi fermati ^ -^
_ _
 I really hope you have enjoyed this tutorial! Thank you for stopping by

 Lucy-Wonderland

Supplies:Elizabeth Craft Designs:
 Other:

Surprise! Happy Birthday Els Blog Hop

$
0
0
Oggi è il compleanno di Els van de Burgt e quale modo migliore per festeggiare, se non con una blog hop di compleanno a sorpresa con il team di Elizabeth Crafts Design Team!
Buon compleanno Els! 
Spero che vi unirete tutti a rendere speciale il compleanno di Els, andandole ad augurarle un felice compleanno sul gruppo Facebook della famiglia di Elizabeth Craft Designs!
Il blog hop è iniziato qui nel blog di Elizabeth Craft Designs, quindi se ti è capitato di arrivare direttamente sul mio blog, potresti tornare lì al primo, in modo da non perdere nulla del divertimento! 
_ _
It's Els van de Burgt's birthday and what better way to celebrate but with a surprise Birthday Blog Hop with the Elizabeth Crafts Design Team!
Happy Birthday Els!
We hope you will join us in making Els birthday special, by dropping by our Elizabeth Craft Designs Family Facebook Group and wishing her a happy birthday! 
The hop started at the Elizabeth Craft Designs blog, so if you just happened to hop onto my blog you might like to head back to there first so you don't miss out on any of the fun!

prima di tutto, ho preparato la base della card, utilizzando un page protector e un fuse tool per sigillare all'internl un foglio di carta patterned e della pailettes.
_ _
First of all, I prepared the base of the card, using a page protector and a fuse tool to seal a sheet of patterned paper and some sequins inside.
ho ritagliato diversi elementi, in particolare un fiore e una scritta, da andare poi a colorare ed incollare sulla nostra card.
_ _
I cut out several elements, in particular a flower and a writing, to then I'll color and paste them on our card.
ed ecco la nostra shaker card con il fiore tridimensionale
_ _
and here is our shaker card with a three-dimensional flower

Bene, ora è tempo di lasciare il mio blog e proseguire nel percorso del compleanno. La tua prossima fermata è per la talentuosa Ekaterina Oleynik.  Non dimenticarti di visitare anche il nostro gruppo Facebook per lasciare i tuoi auguri ad Els! Ecco l'elenco completo dei blog hop:
_ _
Well now it is time to leave my blog as you continue along our birthday hop. Your next stop is to the talented Ekaterina Oleynik. Don’t forget to pop on over to our Elizabeth Craft Designs Family Facebook Group too to wish Els a happy birthday! Here is the complete blog hop list:
  1. Elizabeth Craft Designs Blog<start here>
Lucy_Wonderland

    traveler's notebook Minty Dreams

    $
    0
    0
    ciao!! Qualche settimana fa ho acquistato questo bellissimo traveler's notebook della Prima Marketing, dalle fantasie molto delicate. Lo adoro.

    Mi ricorda il set di carte che ho disegnato, queste qui:

    vi lascio al video spacchettamento,
    alla prossima, LucyWonderland


    A primrose frame

    $
    0
    0

    ciao!! Oggi vi vorrei mostrarvi un piccolo quadretto che ho realizzato con le bellissime fustelle di Elizabeth Craft Design, con la collezione Susan's Garden. Mi sono inspirata ai colori delle primule di Simonetta del blog About Garden. 
    _ _
    Hello!! Today I would like to show you a small frame that I made with the beautiful dies of Elizabeth Craft Design, with the Susan's Garden collection. I got inspired by the colors of Simonetta's primroses, of the About Garden blog.
    foto di AboutGarden (Simonetta Chiarugi)
    Dietro a questa erbacea c'è una leggenda che sembrerebbe proprio attuale!
    Il signor inverno quell'anno proprio non decideva di andarsene, e tutti gli animali del bosco pregavano per l'arrivo Primavera. Indispettito da tali suppliche, decise di andarsene, non senza prima vendicarsi, ovvero trasformando la Primavera in una statua di ghiaccio.
    Venne in aiuto il Sole, che donò agli animali un fiore magico, la Primula, grazie al quale riuscirono a scongelare la statua. E da allora la Primula divenne il simbolo della Primavera.
    _ _

    Behind this herbaceous, there is a legend that would seem so actual!
    Mr. Winter that year just did not decide to leave the land, and all the animals in the forest prayed for the arrival of Miss Spring. Irritated by such supplications, he decided to leave, not without first taking his revenge, turning Spring into an ice statue. The Sun came to help the animals, giving them a magical flower, the Primrose, thanks to which they managed to thaw the statue. And since then the Primrose became the symbol of Spring. 

    Potete trovare il procedimento che ho utilizzato per poter realizzaare il quadretto, nel video qui sotto.
    _ _
    You can find the whole process I used to make the frame in the video below.

    Spero che vi sia stato di ispirazione, grazie per esservi fermati qui.
    Alla prossima
    _ _
    I hope you have been inspired by this project, thank you for stopping here.
    Luciana


    LISTA PRODOTTI USATI _ LISTS OF ITEMS USED

    garden paper diorama

    $
    0
    0
    ciao! Voi conoscete i diorama? io li adoro.Ne ho realizzato uno ispirato ad un giardino.
    _ _
    Hello! Do you know the dioramas? I adore them. I have created one inspired by a garden. 


    ecco come l'ho realizzato:
    • ho creato 2 cornici con la fustella di ModaScrap;
    • ho fustellato 4 volte la scena del giardino;
    • ho ritagliato i diversi elementi all'interno della fustella e li ho colorati;
    • ho incollato questi elementi sulle due cornici, a diversi livelli.

    e questo è il risultato finale.
    _ _
    Here's how I made it:
    • I created 2 frames with ModaScrap's dies; 
    • I cut for 4 times the garden scene; 
    • I cut out the different elements inside the punch and I colored them; 
    • I glued these elements on the two frames, at different levels. 
    And this is the final result.


    spero che questo progetto vi sia piaciuto, ma prima di lasciarci, non dimenticate di visionare gli altri progetti del talentuoso design team, e partecipare al giveaway per ottenere la giftcard. Alla prossima
    _ _
    I hope you enjoyed this project, but before leaving, do not forget to view the other projects of the talented design team, and take part to the giveaway to win a giftcard. See you next time

    LucyWonderland

    solo un piccolo aiuto!

    $
    0
    0
    ciao!! un post fuori dall'ordinario, ma ho bisogno di una mano per aiutare due persone a me vicine !
    non dovete iscrivervi a nulla a fare nient'altro che mettere un "mi piace" a due foto.
    aiutatemi ad aiutare ^_^
    _ _
    Hello!! a post out of the ordinary, but I need a help to help two dear and friends of me!
    you don't have to subscribe to anything to do anything but put a "like" on two photos.
    help me to help ^ _ ^


    una lettera floreale

    $
    0
    0
    ciao! Sono qui oggi per realizzare insieme dei fiori di carta che andremo poi ad applicare su una lettera di legno ed avere così una simpatica decorazione!

    Per realizzare questi fiori ho adoperato questi puncher della Tonic studio, e devo ammettere che sono molto più comodi e veloci da usare rispetto alle fustelle.Oltre ai puncher, che permettono di realizzare diversi modelli di fiori, ci sono anche questi timbrini che trovo....geniali!!
    Per prima cosa ho usato i puncher per creare tante fustellate di cartoncino bianco.

    Ho colorato tutti i vari pezzi, usando come colori il verde acqua e il glicine.
    ho usato i timbri per creare dei dettagli che rendessero il fiore più realistico
    Ho poi modellato i petali del fiore usando un bulino e una spugnetta
    ed ecco i vari fiorellini pronti! come potete vedere, ci sipuò sbizzarrire a creare forme sempre diverse e combinazioni di colori diverse
    e poi, li si possono applicare dove si preferisce, un biglietto, una scatola, o nel mio caso ad una lettera. Sul sito troverete tantissimi supporti da decorare che si adattano a questo tipo di progetto.

    Che ne pensate del progetto finale? a me ha divertito molto realizzarlo!! Spero di avervi ispirato con  le vostre creazioni di fiori. Alla prossima
    Lucy-Wonderland

    my Traveler's Workbook

    $
    0
    0

    ciao!! oggi vorrei parlarvi di un traveler's notebook un po' speciale. E non perchè l'ho realizzato io a mano, ma per quello che rappresenta!Lui è il mio compagno di una avventura che si chiama Scrappin'school, ovvero la prima scuola italiana di scrapbooking online completamente gratuita.

    Questo workbook lo abbiamo realizzato insieme alle nostre iscritte, e sarà il quaderno dove andremo a segnare tutti i nostri progetti, i nostri lavori, i nostri progressi, i consigli utili da tenere sempre con se in un posto speciale.
    Se nel Book of me ti sei creata una stanza creativa, con questo quaderno andremo a creare il tuo laboratorio operativo ^_^

    la lezione è sempre disponibile nella nostra scuola, quindi ti aspettiamo li per questa e tantissime altre!!!
    _ _
    Hello!! today I would like to talk to you about a special traveler's notebook. And not because I handmade it, but for what it represents! He is my partner in an adventure called Scrappin'school, the first Italian school of scrapbooking online completely free. We, me and the members of the school, created together this workbook, and it will be the notebook where we will go to mark all our projects, our works, our progress, the useful tips to always keep with you in a special place. 
    If you have created a creative room in the Book of Me, with this notebook we will create your own workshop ^ _ ^ 
    This lesson and many other lessons are always available at our school, so we are waiting for you!!!


    sulla copertina ho inserito un charm che ho creato con un fiore di carta della collezione di Susan's Garden, che ho colorato e modellato per dargli un aspetto più realistico
    _ _
    on the cover I put a charm that I created with a paper flower from the Susan's Garden collection, which I colored and modeled to give it a more realistic look

    Un setup delle tasche interne
    _ _
    the setup of the inner pockets


    il video dove presento il quaderno e il progetto al suo interno, con alcuni spezzoni di tutorial
    _ _
    a video where you can see more details about the workbook, the project, and a little bit f the tutorial


    la Wonderland a tavola!

    $
    0
    0
    Ciao a tutte!!!
    tra qualche settimana mia sorella si sposa, ed ha scelto come tema del matrimonio il paese delle meraviglie di Alice. Io la sto aiutando a creare qualche addobbo particolare, come il centrotavola che vi sto per mostrare con il post di oggi.
    _ _
    Hello crafters!!
    in a few weeks my sister is going to marry, and she chosed the Alice's Wonderland as theme of her marriage. I'm helping her to create some particular decors, like the centerpiece of the table that I'm going to show you with today's post.
    per realizzare questo centrotavola ho adoperato diversi accessori, ed in particolare:
    la teiera e la lattiera Vardagen _ IKEA
    la sveglia Braller _ IKEA
    il vassoio Skurar _ IKEA
    libri in metallo _ aliexpress
    bottiglietta con applicazioni argento _ mercatino usato

    ho rifinito la composizione con diversi fiori di carta
    _ _
    to make this centerpiece I used different accessories, for example: 
    the Vardagen teapot and milk jug _ IKEA 
    the Braller alarm clock_ IKEA 
    the Skurar tray _ IKEA 
    metal books _ aliexpress 
    small bottle with silver applications _ flea market 

    I finished the composition with different paper flowers
    nella teiera ho infatti inserito un bouquet di fiori di carta realizzati grazie ad alcune fustellate e della carta patterned dai colori molto soft.
    _ _
    Infact I put inside the teapot a bouquet of paper flowers that I made thanks to some metal die and to the patterned paper with very soft colors.
    sulla lattiera ho inserito un fiocco di carta, colorato a mano. Ed ho incollato alla base qualche altro fiore di carta dalla carta patterned. Per potergli dare un aspetto più realistico a queste fustelle, essendo piatte, le ho ho modellate con un bulino ed al centro ho inserito alcuni dettagli di fiori finti.
    _ _
    I placed a hand-colored paper bow on the milk jug. And I glued some other paper flowers from the patterned paper to the base. In order to give them a more realistic look to these die cutted pieces of papers, being flat, I have modeled them with a ball tool and in the middle I have inserted some details of fake flowers.
    Davanti alla sveglia ho voluto dare un tocco di colore più deciso con questi fiori di carta realizzati con i puncher della tonic, che ho poi colorato e modellato .
    _ _

    In front of the alarm clock I wanted to give a more decisive touch of color with these paper flowers made with the punchers of the tonic, which I then colored and modeled.
    Ed ecco il risultato finale!
    Se vi piacerebbe vedere altri elementi decorativi realizzati per il matrimonio, i biglietti, le bomboniere, i segna posti e i numeri delle tavole, ecc....lasciate un commento 😄
    _ _

    And here is the final result! 
    If you would like to see other decorative elements made for the wedding, the cards, the bonbonnieres, the placeholders and the numbers of the tables, etc .... leave a comment 😄

    Alla prossima,
    Lucy-Wonderland

    Spring has Sprung!

    $
    0
    0
    Ciao a tutti, sono qui con un nuovo post che speropotrà esservi di ispirazione! Oggi creeremo insieme una card con un divertente e sofisticato bouquet di fiori. Ho giocato con alcuni fiori, foglie e alcuni rametti e questo è il risultato finale.
    _ _
    Hello everyone, I'm here with a new post that I hope will inspire you!
    Today we will create a fun and sophisticated flower bouquet card. I played with the individual stamped flowers and leaves plus some die cut leafy branches and this is the result!


    Ecco come crearlo:
    Here's how to create it:

    Step 1:
    taglia un foglio di carta scrap delle dimensione 8" x 8" ( oppure potresti realizzare una card quadrata con una piega sul lato superiore).
    Usando un pezzo di carta Kraft marrone da imballaggio crea una sorta di confezione per bouquet, proprio come usano fare i fiorai.
    _ _

    Cut a piece of patterned paper 8" x 8" to form the base of the card.
    (Options: Make a flat card as shown or make a top-fold square card base.)
    Using a piece of Kraft brown paper form the wrapping for the bouquet, just like what the florist would use.
    luciana telesca - lucy-wonderland - spring is sprung 01

    Step 2:
    Timbra fiori e foglie del set Color My Flowers Clear su del cartoncino White Soft Finish Cardstock.
    _ _
    Using the Color My Flowers Clear Stamp set stamp some flowers and leaves onto White Soft Finish Cardstock.
    luciana telesca - lucy-wonderland - spring is sprung 02
    Step 3:
    Colora le immagini con gli acquerelli (come ho fatto io) o con qualsiasi tipologia di colore che tu preferisci, e poi ritaglia le immagini usando le fustelle coordinate.
    _ _
    Color the images with watercolors (as shown) or with your favorite markers or colored pencils and then die cut the images using the coordinating dies. 
    luciana telesca - lucy-wonderland - spring is sprung 03
    Step 4:
    ritaglia e colora circa 6 -7 pezzi di foglie del set Trio of Leave, usando differenti sfumature di verde per ogni varietà di foglia.
    _ _
    Die cut and color assorted leaf pieces using the Trio of Leaves die set (6 or 7 pieces), using different shades of green on each piece for variety.  
    luciana telesca - lucy-wonderland - spring is sprung 04
    Step 5:
    Assembla tutti i pezzi all'interno dell'incartamento da fioraio visto nello step.1, usando del bioadesivo spessorato  e quello semplice tra i vari livelli, in modo da creare un effetto tridimensionale nella composizione.
    _ _
    Arrange all the pieces inside the florist wrap from Step 1, using foam tape between some of the layers for dimension within the arrangement.  
    luciana telesca - lucy-wonderland - spring is sprung 07
    Step 6:
    timbra la scritta Spring Fever, o qualsiasi altro sentiment di vostra scelta, con un inchiostro nero su il cartoncino White Soft Finish Cardstock. Ritaglia un rettangolo intorno alla scritta e distressa i bordi della carta con alcuni inchiostri dalle tonalità seppia. Poi incollalo sopra il tuo bouquet di carta
    _ _
    Stamp Spring Fever or another sentiment of choice with black ink onto White Soft Finish Cardstock. Cut around the sentiment for a rectangular banner and distress the edges with a sepia ink pad. Adhere the bouquet to the square card. 
     
    ed ora sei pronto a donare i tuoi fiori ^_^
    Io spero davvero che questo tutorial vi sia piaciuto! grazie per esservi fermati qui!
    _ _
    I really hope you have enjoyed this tutorial! Thank you for stopping by.

    Lucy-Wonderland

    Supplies:Elizabeth Craft Designs: 

    Other:

    A cornflowers basket card

    $
    0
    0
    Ciao!!! Oggi vorrei parlarvi di una fustella davvero troppo carina e divertente: la "Scissor Spring Mechanisms", ovvero il meccanismo per realizzare delle molle di carta.

    _ _
    Hello!!! Today I'd like to talk about a really cute and fun die: the "Scissor Spring Mechanisms".
    Questa fustella offre tantissime soluzioni di utilizzo, e a tal proprosito vi rimando a questo post qui sul blog della Elizabeth Craft designs, dove potrete avere tantissimi spunti perchè ogni membro del design team l'ha utilizzato in modo differente. Io l'ho adoperata sotto il cestino, per poter guadagnare dell'extra spazio e così poter inserire i miei fiordalisi di carta!
    _ _
    This die offers so many solutions, and about this purpose I refer you to this post here on the blog of Elizabeth Craft designs, where you can get lots of ideas because each member of the design team has used it differently. I used it under a paper basket, and earn in this way the extra space and be able to insert my paper cornflowers!
    Ho ritagliato e colorato la fustella del cestino, Garden Notes - Gathering Basket, ed ho incollato sul retro una fustellata dello Scissor Spring Mechanisms quella più corta. L'idea è quindi quella di creare un cestino tridimensionale.
    _ _
    I cut and colored the basket, Garden Notes - Gathering Basket, and I glued the shorter one of the Scissor Spring Mechanisms dies on the back. The idea is therefore to create a three-dimensional basket.

    Ho utilizzato come base della card un foglio di carta patterned delle dimensioni 6"x6", al centro del quale ho realizzato il taglio verticale dove inserire il meccanismo. Ho messo solo un po' di colla nella base del cestino per farla rimanere fissata al foglio. La parte superiore è rimasta invece staccata per avere più spazio.
    _  _ 
    I used a 6 x 6 "patterned sheet of paper as the basis of the card, and in the middle I made the vertical cut where to insert the mechanism. I put only a little of glue in the base of the basket, to make it remain attached to the sheet.The upper part has instead been detached to have more room inside.

    Ho ritagliato, colorato e modellato diversi fiori di fiordaliso, Garden Notes - Cornflower Bachelor Button, e qualche ramo di bacca, Garden Notes - Berry Spray. Ho incollato i fiori, i rametti di bacche e le varie foglioline sopra la card.
    _ _
    I cut, colored and shaped several cornflower blossoms, Garden Notes - Cornflower Bachelor Button, and some branch of berry, Garden Notes - Berry Spray. I glued the flowers, the sprigs of berries and the various leaves on the card.
    Infine ho decorato il cestino con alcuni abbellimenti, come il fiocchetto di spago ed un po' di erbetta e fiorellino di campo. Ho incollato il foglio su una card bianca dove scrivere il messaggio ed ho creato una busta dove inserirla. E questo è il risultato finale.
    _ _
    Finally I decorated the basket with some embellishments, such as a bow of string and a little bit of grass and little field flower.I glued the sheet on a white card where to write my message and I created an envelope to insert it. And this is the final result.

    Vi ricordo di andare a visionare la pagina fb o il blog della Elizabeth Craft Designs per avere la possibilità di vincere un buono di 20$ da spendere sul loro sito. dovrete lasciare un commento su come voi avreste usato la fustella dello Scissor Spring Mechanism.
    _ _
    For today's challenge Elizabeth Craft Designs are giving away a $20 Gift Card to use on our website to 3 winners. To enter simply leave a comment on the Elizabeth Craft Designs Facebook Giveaway Blog Post or the Elizabeth Craft Designs Challenge post and tell us What Elizabeth Craft Designs dies or stamp sets would you use with the Scissor Spring Mechanism die set to create a card, scrapbook layout of home decor item? We will select 3 lucky winners in a random drawing The winners will be announced on Friday, April 20th on the Elizabeth Craft Designs Blog and our Facebook page.

    GRAZIE e alla prossima 😊
    Lucy Wonderland

    3D tag Herbarium _ sunflower

    $
    0
    0

    Ciao, oggi vorrei iniziare un progetto che spero diventi una rubrica fissa del giorno 20 di ogni mese.
    Questo progetto vorrei chiamarlo 3D tag Herbarium, perchè mi piacerebbe creare un erbario tridimensionale usando tutti i bellissimi fiori di carta disegnati da Susan Tierney Cockburn.
    _ _
    Hello, today I would like to start a project that I hope will become a regular post for every 20th of each month. I would like to call this project 3D tag Herbarium, because I would like to create a three-dimensional herbarium using all the beautiful paper flowers designed by Susan Tierney Cockburn.


    Oggi si parte con il Girasole!
    _ _
    today I will start with the Sunflower

    Per prima cosa ho preparato il fiore e i rametti, utilizzando la fustellaGarden Notes - Sunflower  e Garden Notes - Leafy Berry Branch 1.  Ho ritagliato dal cartoncino Soft Finish cardstock due fustellate di ogni signolo pezzo. Le ho colorate e modellate utilizzando i tools creati appositivamente dallaElizabeth Craft Designs.
    _ _
    First of all, I prepared the flower and the branches, using the Garden Notes - Sunflower and Garden Notes - Leafy Berry Branch 1. I cut them from the Soft Finish cardstock cardstock, two times for each piece. I colored and shaped them using the tools created by Elizabeth Craft Designs.

    Ho ritagliato dal cartoncino bianco soft finish cardstock una tag, semplicemente rimuovendo gli spigoletti laterali, e facendo un buchino al centro.
    Ho creato uno sfondo dall'aspetto più vintage attraverso i distress ink, in particolare ho usato i colori:
    • forest moss
    • old paper
    • tea dye
    • vintage photo

    Ho creato poi qualche goccia spruzzata qua e là con il colore pumice stone.
    _ _
    I cut a tag from the a Soft Finish cardstock cardstock, simply removing the side edges and making a small hole in the middle. I created a more vintage-looking background through ink distress, in particular I used the colors: 
    • forest moss
    • old paper
    • tea dye
    • vintage photo.

    I then created a few drops of ink, here and there, with the pumice stone color.

    Sulla tag ho incollato un pezzo di carta scritto con la macchina da scrivere, dove ho segnato il nome il latino e una piccola curiosità sul fiore.

    Ho terminato la tag con un fiocco in filo di spago molto grossolano.
    _ _
    On the tag I glued a piece of paper written with the typewriter, where I write the Latin name and a little curiosity about the flower. 
    I finished the tag with a bow in a very coarse string.

    e questo è il risultato finale. Spero questo progetto possa entusiamare voi esattemente quanto me!
    Sotto trovate tutti i link ai vari prodotti usati.
     _ _
    and this is the final result. I hope this project can enthrall you as actually as me! Below are all the links to the various products used.


    Alla prossima
    Lucy-Wonderland


    Viewing all 481 articles
    Browse latest View live


    Latest Images